![TW Blue Logo 230908a.png]](https://help.trakwell.ai/hs-fs/hubfs/TW%20Blue%20Logo%20230908a.png?width=126&height=17&name=TW%20Blue%20Logo%20230908a.png)
Table of contents
- Open your contacts
- What you can see
- Search and filter contacts
- Group your contacts
- Save a search as a favorite
- Switch views
- Choose your columns
- Create a new contact
- Export your contacts
- Review customer history
Open your contacts
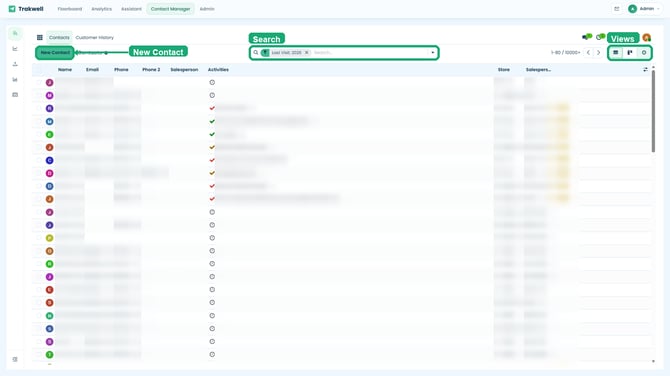
Click Contact Manager in the top menu. You'll land on the Contacts list.
To jump between areas of Contact Manager, click the grid icon in the top left corner and choose Calendar, Contacts, or CRM.
What you can see
The contacts, activities, and pipeline you see depend on your role.
| Role | What you see |
|---|---|
| Salesperson | Only your own contacts, scheduled actions, and pipeline |
| Store Manager | Everything for your store |
| Company Admin/Manager | Everything across all store locations on your account |
Search and filter contacts
The search bar sits in the center of the page. Type a name, phone number, or email to find a contact.
To narrow the list, click the arrow on the right side of the search bar and pick a filter. You can filter by:
| Filter | Options |
|---|---|
| Probability | Low, Medium, High, Undefined |
| Sale Type | Sale, Potential, Lost |
| Salesperson Inactive | Contacts assigned to salespeople who no longer have an active account |
| Address | Has Address, No Address |
| Phone | Has Phone, No Phone |
| Has Email, No Email | |
| Last Visit | Choose a time period |
| Last Sale | Choose a time period |
| Podium | Sent, Not Sent, Reviewed |
| Missing info | No Product Category, No Scheduled Action, No Advertising |
| Archived | Contacts that have been archived |
You can also filter by scheduled activities:
| Filter | What it shows |
|---|---|
| My Activities | All activities assigned to you |
| My Late Activities | Your activities that are past due |
| My Today Activities | Your activities due today |
| My Future Activities | Your upcoming activities |
| All Late Activities | Every past due activity you have access to |
| All Today Activities | Every activity due today that you have access to |
| All Future Activities | Every upcoming activity you have access to |
Need something more specific? Use Custom Filter to build your own.
Active filters show up as chips in the search bar. Click the X on a chip to remove it.
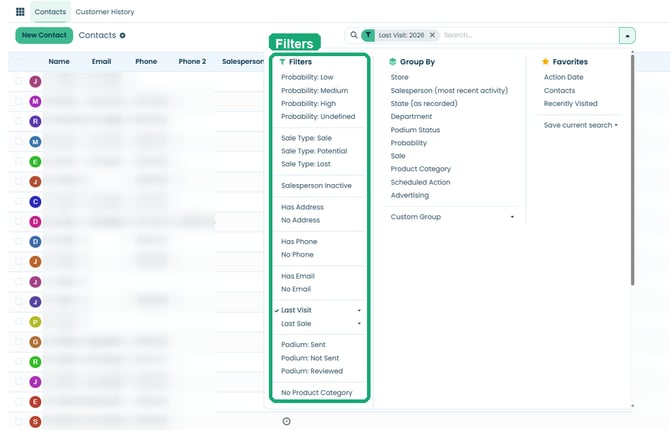
Could work nicely here for the missing info filters, something like "Use the No Product Category, No Scheduled Action, and No Advertising filters to find contacts that need their details filled in." Your call if it's worth adding.
Group your contacts
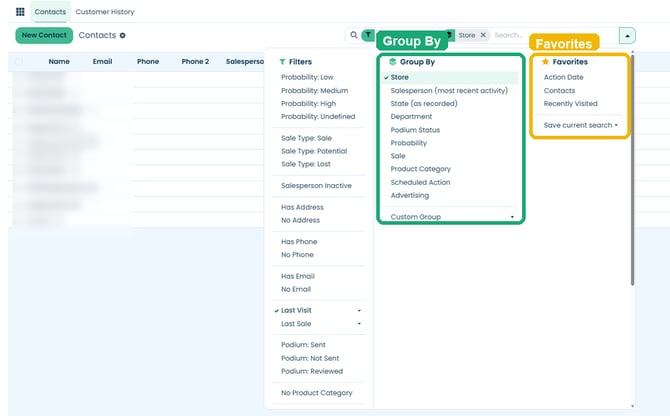
Grouping sorts your list into sections, like all contacts for each store or each salesperson. Open the search bar menu and choose an option under Group By:
- Store
- Salesperson (most recent activity)
- State
- Department
- Podium Status
- Probability
- Sale
- Product Category
- Scheduled Action
- Advertising
To group by something not on the list, choose Custom Group and pick a field.
Save a search as a favorite
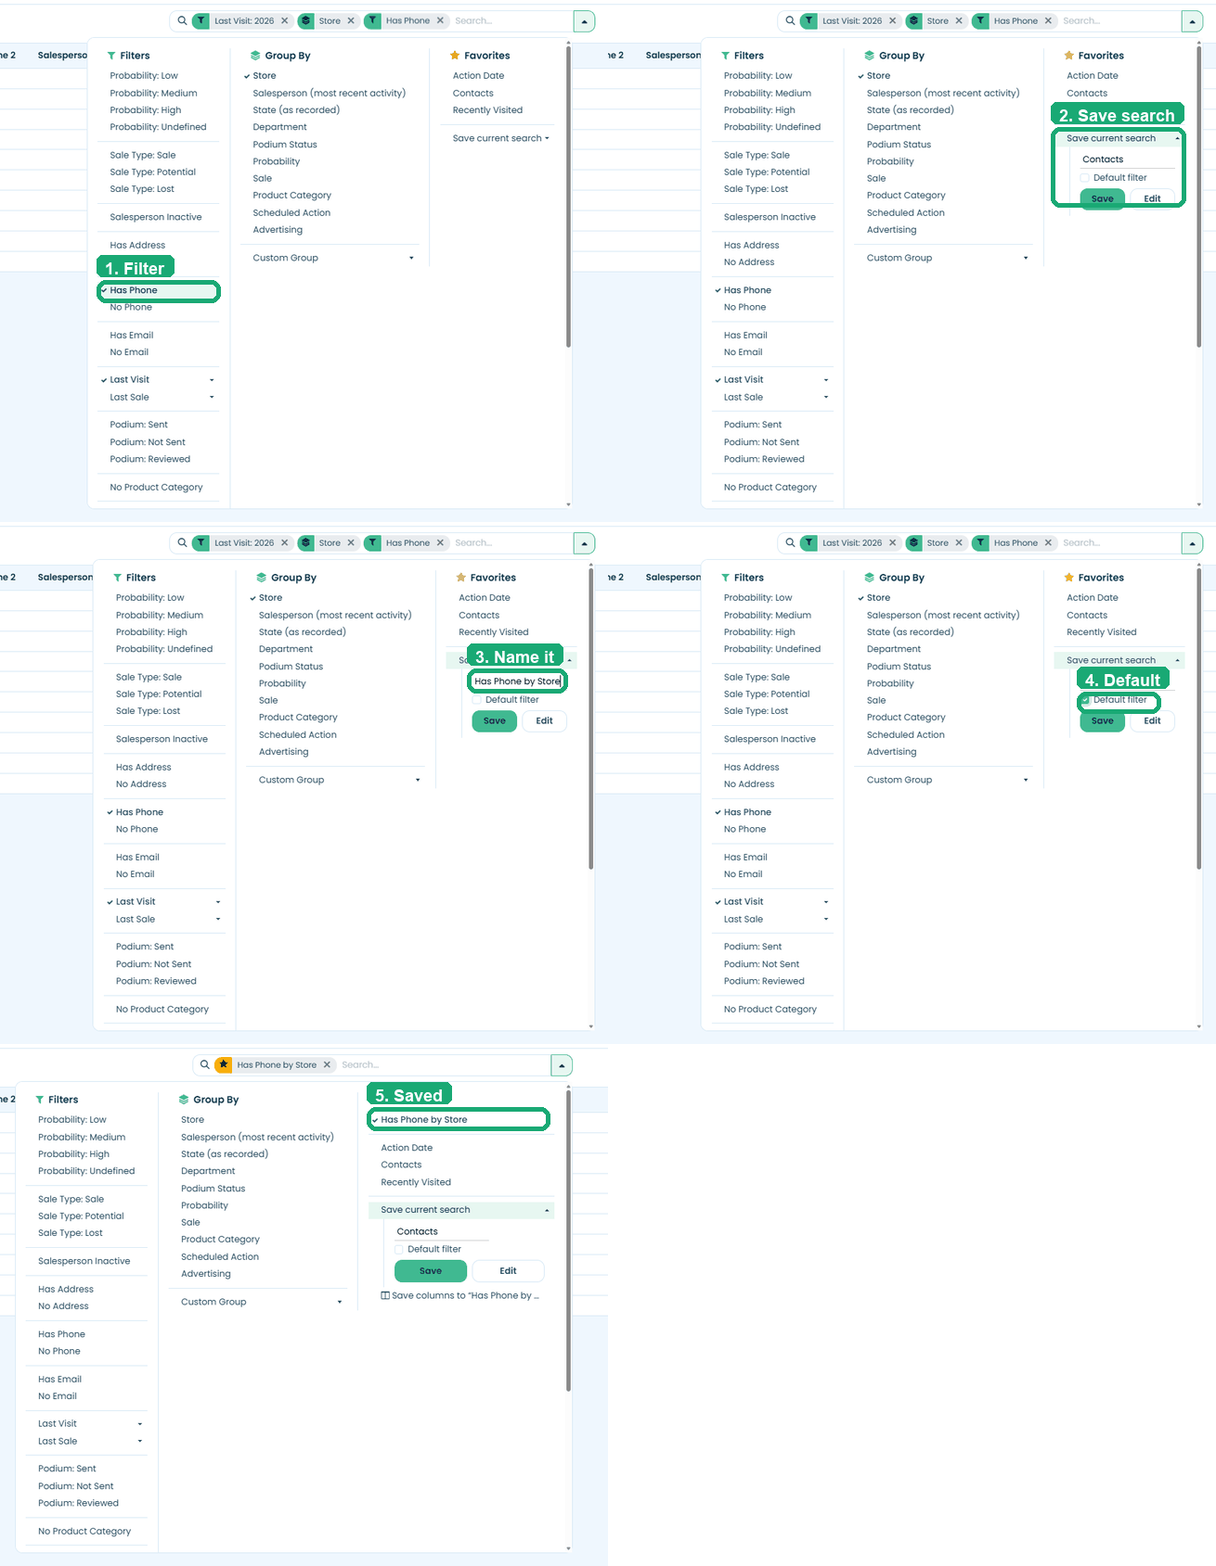
Once your filters and groups are set the way you like, save them so you don't have to rebuild them every time.
- Open the search bar menu.
- Under Favorites, click Save current search.
- Enter a name.
- Check Default filter if you want this view to load every time you open Contacts.
- Click Save.
To share a favorite or change its settings, click Edit instead of Save. From there you can:
- Rename the favorite
- Share it with specific users under Shared with
- Turn Default Filter on or off
- Adjust the filter rules the favorite uses
Default filters are personal, so turning one on only changes what you see. When you share a favorite, the people you share it with can set it as their own default.
By default, Contacts opens with Recently Visited, a shared favorite that shows contacts with a recorded visit. Only a company admin can change or delete it. If you want a different starting view, save your own favorite and set it as your default.
Switch views
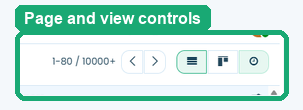
Use the buttons on the right side of the page to change how your contacts are displayed.
| View | What it shows |
|---|---|
| List | Contacts in rows and columns. This is the default. |
| Kanban | Contact cards with name, email, phone, and city |
| Activity | Scheduled activities for each contact, sorted into To-Do, Email, Call, Meeting, and Document columns |
The page counter next to the view buttons (for example, 1-80) shows which contacts you're looking at. Use the arrows to move to the next or previous page.
Choose your columns
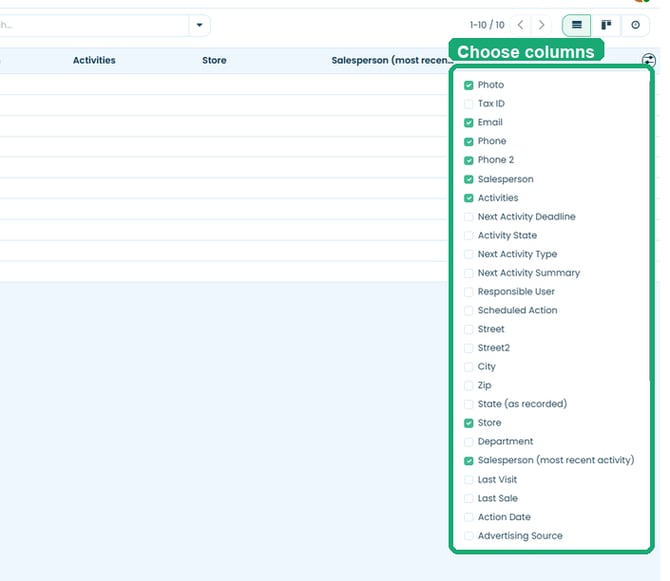
In List view, click the column icon on the far right of the header row. Check or uncheck the columns you want to see.
Create a new contact
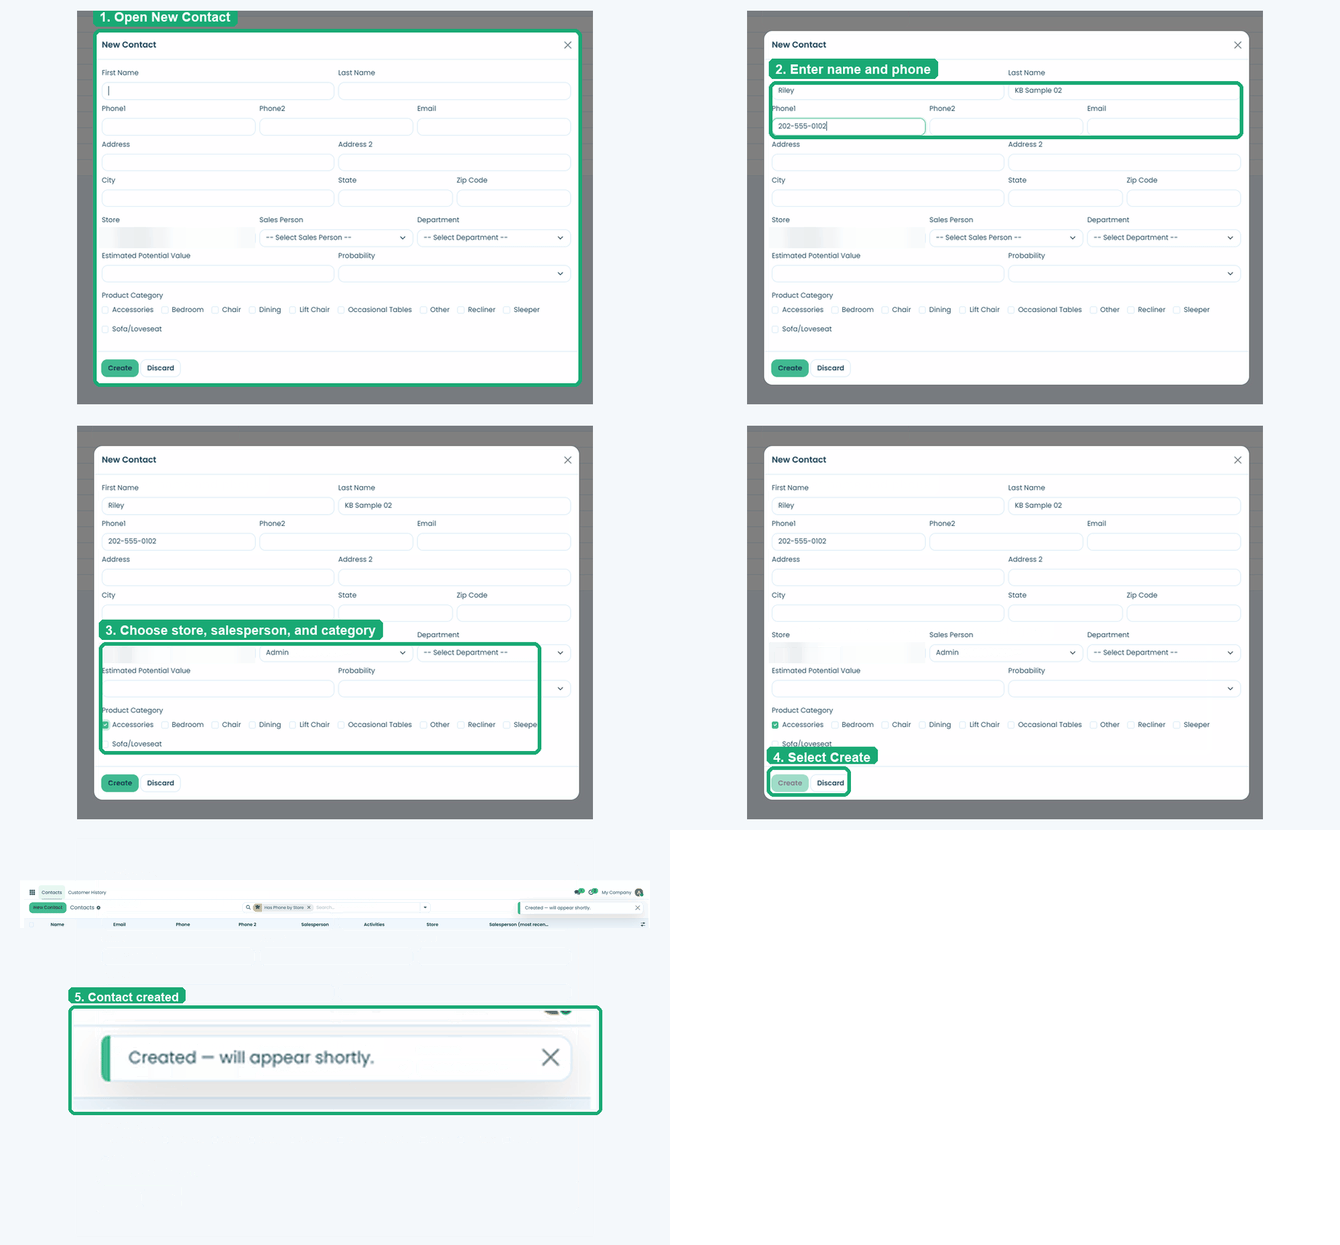
- Click New Contact.
- Fill in the contact's details.
- Click Create.
These fields are required:
- First name and last name
- At least one way to reach the customer: phone, email, or address
- Store
- Salesperson
- Product category
If you're a salesperson, the contact is assigned to you automatically, but you can change it. Managers will need to pick the store and salesperson.
Export your contacts
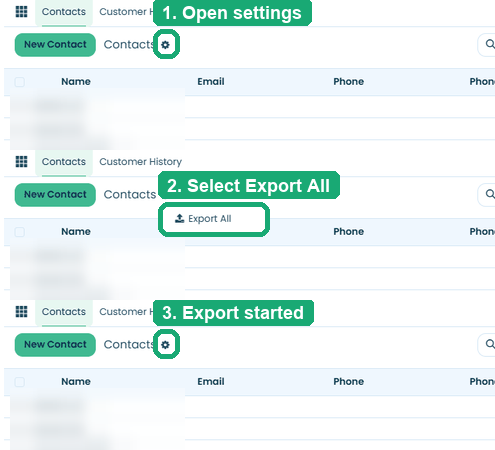
- Click the gear icon next to the page name.
- Click Export All.
Your contacts download as an Excel (.xlsx) file. Anyone can export, but you'll only get the contacts you have access to.
Review customer history
Customer History is a running log of everything tied to your contacts. Each row is one event, like a sale, an appointment, or a note. Click Customer History at the top of the page to open it.
Customer History uses the same search, filters, favorites, and column options as the Contacts list. It opens with the Customer History saved search unless you've set your own default.
Here's what each type means:
| Type | What it means |
|---|---|
| APTMT | An appointment or follow-up, booked from Floorboard or Contact Manager |
| SALE | A sale submitted from Floorboard |
| POTENTIAL | A potential sale submitted from Floorboard |
| CRM_SALE | A sale logged from a customer record in Contact Manager |
| LOST_SALE | A lost sale logged from a customer record |
| NEW_CUSTOMER | A new contact was created |
| NOTE | An internal note |
| An email sent to the customer | |
| PODIUM | A Podium review request |
| OPERATION | Older operational activity, like call notes and follow-ups |
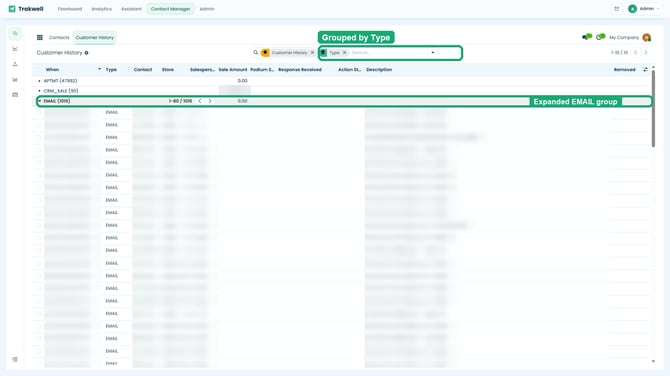
Group by Type to see how many of each event you have. Click a group to expand it.
Click any row to see the full details, including the description, store, and salesperson. Click the contact's name to open their customer record.
The Removed column shows a date if a record was removed. Current records leave this column blank.
Still have questions? Reach out at support@trakwell.ai or call 833-503-9934.